srun --pty -p priority -t 12:0:0 --mem=8G -c 1 bashInstallation instructions
Instructions for installing various package managers and pipelines
Compute node
By default upon logging into O2, each user is placed on a login node. Login nodes are NOT suitable for supporting intensive computational processes. Intensive analyses on the login mode will be automatically terminated by O2 and users may be flagged by the admin if this occurs consistently. Please be sure to request a compute node to execute any tasks. For additional details about compute nodes, please reference the O2 documentation.
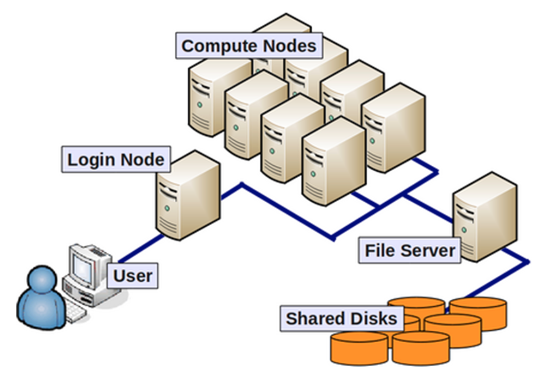
This command requests a compute node for 12 hours, with 8GB of memory and 1 core. Compute nodes automatically terminate when you disconnect from the O2 cluster or when the time limit is met, whichever occurs first.
mamba/minimamba
Executing bioinformatics analyses often involve installing multiple packages/tools. Mamba is a package manager that allows users to create environments. Environments separate these package installations into individual “partitions”, which helps 1) prevent users from disrupting their own base environment with the installations of these new packages, 2) facilitate easy access and removal of packages and 3) manage/create environments individually for each pipeline or type of analysis.
Install mamba on O2 terminal (the installer is interactive — accept the license, accept the default install location, and enter yes when asked to run conda init):
cd ~;
curl -L -O "https://github.com/conda-forge/miniforge/releases/latest/download/Miniforge3-$(uname)-$(uname -m).sh";
bash Miniforge3-$(uname)-$(uname -m).sh;
Initialize mamba on O2 terminal before usage (first time only):
# close terminal and reopen, or:
source ~/.bashrc
Snakemake
Snakemake is a package that helps structure and streamline code writing for bioinformatics pipelines, which is particularly useful for complicated pipelines that involve multiple steps and a huge number of files. Snakemake 8 moved cluster support out of the core package into separate executor plugins, so submitting jobs to O2’s Slurm scheduler needs one installed alongside Snakemake itself. Create your first conda environment named snakemake_8_20_3 with Snakemake and the Slurm executor plugin installed with the following command.
To read more about snakemake, please refer to the official Snakemake documentation.
Install snakemake on O2 terminal:
mamba create -n snakemake_8_20_3 -c conda-forge -c bioconda snakemake=8.20.3 snakemake-executor-plugin-slurm snakemake-executor-plugin-slurm-jobstepTo use snakemake, activate this environment maintained by mamba:
mamba activate snakemake_8_20_3VSCode
VSCode is a code text editor application that provides an easy-to-use interface for viewing and writing code/scripts. This section will detail how to 1) install VSCode as an application on your computer, 2) install VSCode extensions and 3) setup launching VSCode as an interface to view and edit your files on the O2 cluster.
Install VSCode application
To install VSCode on your computer, use this link.
Install VSCode extensions
VSCode has a number of extensions that allow each user to customize their own coding experience. We recommend the installation of three extensions:
Rainbow CSV- identifies “,” as the separator in CSV files, highlights each column with a different colorVSCode-pdf- view PDF files directly within the VSCode interface
To install extensions:
- Navigate to the toolbar on the far left of the VSCode interface and click on the icon that resembles four squares.
- Use the search bar that has the caption “Search Extensions in Marketplace” to find extensions that you like and install each of them individually.
Use a VS Code tunnel to access an O2 compute node
A VS Code tunnel is generally more reliable than Remote-SSH for working on a compute node: the connection survives closing your laptop lid or losing wifi and reconnects automatically, and once it’s running you connect straight to your compute node without proxy-jumping through the login node each time. The following steps are adapted from the official O2 documentation on VS Code Remote Tunnel using sbatch.
Make sure you already have a scratch directory (see Making a scratch directory). If you’re not sure, run the following on O2 — it’s safe to run again even if you already have one:
/n/cluster/bin/scratch_create_directory.shCopy the job script for the VS Code tunnel to your home directory:
cp /n/groups/kwon/xin/vscode.sh ~This script requests a compute node via
sbatchand launches a VS Code tunnel on it once the job starts running. It should look like this:#!/bin/bash #SBATCH -p priority # Change to desired partition #SBATCH --mem=1g # Change to desired RAM #SBATCH --time=08:00:00 # Change to desired wall-time #SBATCH -c 1 # Change to desired CPU cores #SBATCH -o vscode.out # Output file name set -o errexit -o nounset -o pipefail MY_SCRATCH="/n/scratch/users/${USER:0:1}/${USER}/vscode" mkdir -p $MY_SCRATCH echo $MY_SCRATCH # If not done yet, download the VS Code CLI tarball into $MY_SCRATCH if [ -e "$MY_SCRATCH/code" ]; then echo "using $MY_SCRATCH/code" else echo "install a new version of code" curl -Lk 'https://code.visualstudio.com/sha/download?build=stable&os=cli-alpine-x64' | tar -C $MY_SCRATCH -xzf - fi # Sign in with the provider of your choice (leave only one of the two lines below uncommented) $MY_SCRATCH/code tunnel user login --provider microsoft #$MY_SCRATCH/code tunnel user login --provider github # Accept the license terms & launch the tunnel $MY_SCRATCH/code tunnel --accept-server-license-terms --name o2tunnel--timecontrols how long the tunnel stays up (8 hours by default); the tunnel dies when the job ends, at which point you’ll need to resubmit the job and reconnect. Increase it if you need a longer session.Submit the job:
sbatch ~/vscode.shCheck the job status, and once it’s running, get the sign-in link from the job’s output file:
squeue | grep <hms_id>
# status column shows 'PD' while pending; rerun this until it shows 'R' for running

cat ~/vscode.out
# once running, this prints a line like:
# To sign in, use a web browser to open the page https://login.microsoft.com/device and enter the code [CODE] to authenticate.
Open the link printed in
vscode.out(e.g.https://login.microsoft.com/device) in a browser, enter the code shown, and sign in with the account for the provider you chose in step 2 (Microsoft or GitHub).Connect from your local VS Code:
Install the Remote - Tunnels extension (
ms-vscode.remote-server) — only needed once.Open the VS Code Accounts menu and choose “Turn on Remote Tunnel Access”.
Click the bottom-left remote-connection icon, then select “Connect to Tunnel…” from the options that appear at the top.
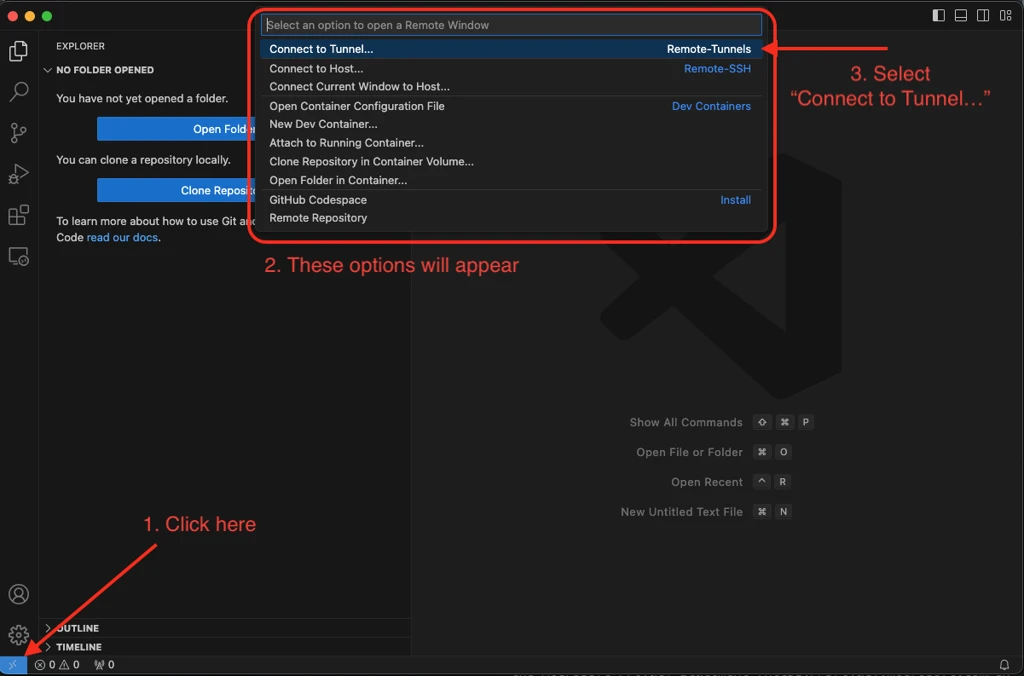
Choose the same provider (Microsoft or GitHub) you signed in with in step 5.

Open the Remote Explorer icon and, under the Tunnels section, select the tunnel name you gave the job (
o2tunnelin the script above) to connect — either in the current window or a new one. Before clicking, confirm you seeRemote -> Tunnels -> o2tunnellisted as running.
Once connected, any terminal you open in VS Code runs on the compute node where your job is executing.
Setup O2 access with VSCode: Create a passphrase to expedite O2 access
While logging into O2 on the terminal only provides a command-line interface and linux commands are needed to modify files, the main advantage of accessing O2 through VSCode is it allows users to easily view and edit their files in an interactive manner within the VSCode application.
After setting up VSCode, the VSCode tunnel, and establishing a connection to O2 login node through VSCode tunnel, follow these steps to launch VSCode on a compute node in O2. This is useful if you plan to use VSCode to open or edit larger files as this may be a process that is too computationally intensive for login nodes to handle, leading the O2 cluster to automatically terminate your connection to O2 through VSCode. For a more detailed description, please refer to the official O2 documentation on VSCode, which was used as a reference for this section.
- Generate SSH key on your own computer’s terminal with the following command. When prompted for file name, press enter to use the default file name. Enter a passphrase to protect your SSH keys.
# input this line into your computer's terminal
ssh-keygen -t rsa

# sample output (See O2 documentation for reference)
Generating public/private rsa key pair.
Enter file in which to save the key (/USERHOME/.ssh/id_rsa):
Enter passphrase (empty for no passphrase):
Enter same passphrase again:
Your identification has been saved in /USERHOME/.ssh/id_rsa.
Your public key has been saved in /USERHOME/.ssh/id_rsa.pub.
The key fingerprint is:
a5:b5:38:73:b7:3c:a6:8a:1d:a8:bd:87:4e:be:33:21 - Copy your computer’s SSH public key onto the O2 SSH authorized_keys file, which allows your computer and O2 to recognize each other
- Linux or Mac:
# input this line into your computer's terminal
ssh-copy-id -i $HOME/.ssh/id_rsa.pub <hms_id>@o2.hms.harvard.edu
# input O2 password and complete Duo authentication- Windows:
# input this line into your computer's terminal
Get-Content "$env:USERPROFILE\.ssh\id_rsa.pub" | ssh <hms_id>@o2.hms.harvard.edu "mkdir -p ~/.ssh && cat >> ~/.ssh/authorized_keys"
# input O2 password and complete Duo authentication- Add new lines in your computer’s SSH config file. Replace HMS ID with your own ID. After modification, use
Ctrl + Xfollowed by enter to save the file.
# input this line into your computer's terminal
# open your computer's SSH config file
nano ~/.ssh/config

#for Windows systems use
notepad $env:USERPROFILE\.ssh\config

# copy and paste the following lines into the config file
Host o2jump
  HostName o2.hms.harvard.edu
  User <hms_id>
  ForwardAgent yes
  ForwardX11 yes
  ForwardX11Trusted yes

Host o2job
  HostName compute_node_of_job
  User <hms_id>
  ProxyJump o2jump
ForwardAgent yes- Request a compute node on O2, update your local config file with the node information for VSCode with the following command. Please use the command appropriate for your operating system, as the syntax varies slightly. Your requested compute node will be allocated with a 1 hour runtime, 4GB memory and 1 core.
- Linux:
# input this line into your computer's terminal
ssh <hms_id>@o2.hms.harvard.edu "/n/groups/kwon/joseph/submit_o2.sh" | tail -n 1 | xargs -I {} sed -i "/^Host o2job$/,/^\s*Host /{s/^\(\s*HostName\s*\).*$/\1{}/}" ~/.ssh/config- Mac:
# input this line into your computer's terminal
ssh <hms_id>@o2.hms.harvard.edu "/n/groups/kwon/joseph/submit_o2.sh" | tail -n 1 | xargs -I {} | xargs -I NODE_HOSTNAME sed -i '' "/^Host o2job$/,/^[[:space:]]*Host / s/^\([[:space:]]*HostName[[:space:]]*\).*/\1NODE_HOSTNAME/" ~/.ssh/config- Windows:
# input this line into your computer's terminal
$nodeHostname = (ssh <hms_id>@o2.hms.harvard.edu "/n/groups/kwon/joseph/submit_o2.sh" | Select-Object -Last 1); (Get-Content "$env:USERPROFILE\.ssh\config") | ForEach-Object { if ($_ -match 'Host o2job') { $_; $foundJob = $true } elseif ($foundJob -and $_ -match '^\s*HostName\s+') { $foundJob = $false; $_ -replace '(?<=HostName\s*)\S+', $nodeHostname } else { $_ } } | Set-Content "$env:USERPROFILE\.ssh\config"- Open VSCode, select the bottom left purple icon to launch the remote connection. Select ‘Connect to Host’ and
o2jobas the server. Proceed by inputting O2 login password and completing Duo authentication. Select ‘Continue’ to proceed.
Setup for launching VSCode on a O2 compute node is now complete. After setup, it is only necessary to execute Steps 4-5 each time to launch this.